


NOTICE
My involvement with xPL has come to an end. Automation has moved on considerably over the past few years, and it is now possible to buy a stand-alone controller off the shelf for a reasonable price, without having to spend hours writing your own code.
This website is being maintained as a record of my xPL development work up until 2011.
I have released the full source code of all my xPL projects into the public domain. You can download the archive from here.
Mal
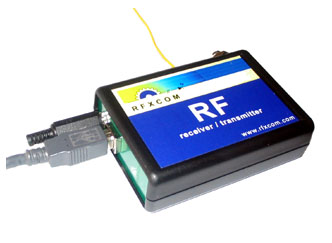
RFXCOM offer a range of USB RF transmitters and receivers that are compatible with a large number of common wireless Home Automation protocols.
The RFXCOM range also includes a variety of 1-wire sensor modules and electricity meters that are compatible with their receivers.
Due to the support for such a wide range of devices, the RFXCOM receivers are a better choice than the rival W800RF32 device from WGL Designs.
The xPLRFX service for Windows 98, 2000, XP and Vista provides full support for any number of RFXCOM transmitters and receivers in a single application, including all of the protocols handled by these devices.
xPL and RFXCOM support devices from the following manufacturers:


RFXCOM Receiver Protocols
X10 Lighting,X10 Security
X10 PC Remotes
ATI Remote Wonder / Medion
Digimax 210/TH10 Thermostats
RFXCOM RFXSensor, RFXPower
HomeEasy (Device Compatibiltity)
Electrisave Cent-a-Meter
Owl Wireless Electricity Monitor (CM113 and CM119)
Visonic PowerCode and CodeSecure (including BT VP1000 Home Monitor Sensors)
Domia Lite
Bye Bye StandBy
KlikOn-KlikOff (KlikAan-KlikUit)
ELRO AB600
NEXA
Proove
Oregon Scientific
Oregon Scientific sensors that are tested and are known to work with RFXCOM and xPL are listed below:
THR128 / THR138 / THC138 Indoor Thermometer
THC238 Thermometer Probe
THWR288 Floating Water Thermometer
AW129 / AW131 BBQ Probe
THN132N Outdoor Thermometer
THGN122N / THRN122N / THGR122 / THGR228N / THGR268 / THGR810 Indoor Temp-Hygro
THGR918 / THGRN228NX / THGR328N / RTGR328N / WTGR800 Outdoor Temp-Hygro
BTHR918 / BTHR918N / BTHR968 Temp-Hygro-Baro
PCR122 / PCR800 / RGR126 / RGR682 / RGR918 Rain Gauge
RTGR328N Temp-Hygro with Date and Time
STR918 / WGR918 / WGR800 / WTGR800 Anemometer
UVN128 / UV138 / UVN800 Ultraviolet Sensor
BWR101 / BWR102 / GR101 Scales
Many other Oregon sensors will probably work, but have not yet been tested.
RFXCOM Transmitter Protocols
X10 LightingX10 Security
HomeEasy (Device Compatibiltity)
Domia Lite
Bye Bye StandBy
KlikOn-KlikOff (KlikAan-KlikUit)
ELRO AB600
NEXA
Proove
Intertechno
Duwi
Harrison Curtain Motors
RFXMitter Transmitter Protocols
In addition to the RFXCOM Transmitter Protocols listed above, the RFXMitter can also sendIkea Koppla
Flamingo
Waveman
The requirements for using RFXCOM transmitters and receivers with xPL are:
1) A PC running Windows 2000, XP, Vista or Windows 7
2) RFXCOM USB module(s) containing the desired mix of transmitters and receivers.
3) .NET 2.0
4) An xPL installation consisting of at least xPLHub and xPLHal.
5) xPLRFX
xPLRFX


Platforms: 2000 / XP / MCE / Vista / Win7
Version: 5.2.0
Filesize: 1.19Mb
Updated: 1st August 2010
 Download
xPLRFX does not work in isolation. To be useful it needs to be part of an xPL network. The basic software requirements for an xPL network are the xPLHub (which must be installed on every computer running xPL applications), and xPLHal, which is the "brains" of the system. Scripts running under xPLHal read incoming xPL events and send out commands to control other devices. A more detailed description of xPL can be found here.
Download and run the xPLRFX installer (.msi) file. The installation process is straightforward and will set up the xPLRFX service, and the xPLRFX configuration application.
Once installed, run the xPLRFX configuration program, and set up your RFXCOM transmitter/recievers (See the section on Configuration below). No RF messages will be sent/received until this is done.
Next, run xPLHal Manager and find xPLRFX under the Devices/Awaiting Configuration tab. Double click on the xPLRFX entry and change the instance from Default to your chosen instance name (maximum 16 characters).
To test the system, start the xPLMonitor from xPLHal Manager's Tools menu. If you have a receiver, get one of your RF devices to transmit a message. You should see an xPL message appear in the log. If you have a transmitter, use the Send xPL Message option from the xPLHal Manager Tools menu to send a message to control one of your devices. If you have a compatible receiver, you should also see this message appear in the xPL monitor log.
If the messages are not received, or the xPLRFX service cannot be seen in xPLHal Manager, there may be an error in your xPL network. Download and run xPLDiag to test your installation. For further help, post a message to the xPL forums.
When first installed, xPLRFX requires some configuration before it can function. The installation process will add a link to the xPLRFX configuration program on your program menu under 'xPL/xPLRFX'. Run the program, and the main screen will appear.
Note - while the configuration program is running, the xPLRFX service will be stopped.

The screen is divided into two sections. The top section, labelled 'USB Modules' lists all the RFXCOM transmitter and receiver devices that have been set up. The bottom section, labelled 'Configurable RF Devices' lists all the RF devices that the xPLRFX service has received messages from (except standard X10 devices - more on that later). When first run, both these sections will be empty.
The first step is to set up your RFXCOM USB Modules. Each module may contain one or two receivers, or a single transmitter. If your module contains receiver(s), click the 'Add Receiver' button. If it contains a transmitter, click 'Add Transmitter'. You will be presented with one of the following dialogs:
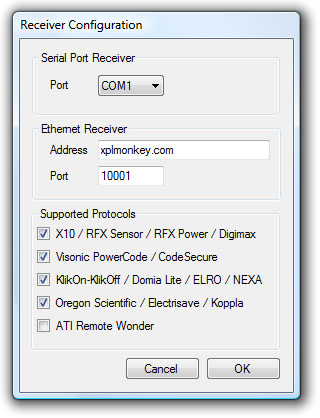
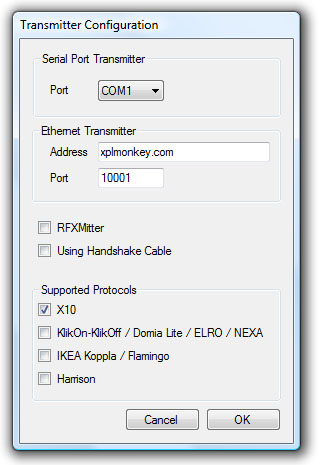
If your module is connected directly to your PC via USB, or is an Ethernet module used with a COM port redirector, choose the correct serial port for the module from the drop-down list (the module must be connected for the port number to be available). If you want to connect to your module via the ethernet, then fill in the address and port number of the module. Note: by entering an ethernet address and port number, xPLRFX will assume an ethernet connection is desired, and will ignore any COM port that has been selected.
Next, check all the protocols that you want to use. Note that not all protocols are supported by the older RFXCOM receivers. For transmitters, each protocol adds to the time taken to send messages, so only enable the ones you need. If your transmitter is an RFXMitter, then protocols are not specified here. Instead, the protocol is included in the xPL message you send to xPLRFX. Make sure the RFXMitter checkbox is checked, so that xPLRFX will know to expect protocols in the messages. Click OK to save your settings and return to the main screen.
If this is the first time you have run the configuration program, the 'Configurable RF Devices' section will probably be empty. Devices do not appear here until the xPLRFX service has received a transmission from them, so click OK to leave the configuration program (which will restart the service), and then get all of your devices to send messages. You can monitor activity in xPLHal Manager's message monitor. When you return to the configuration program, you should see your devices listed. Note - Standard X10 devices, including those that are mapped to X10 such as ELRO, NEXA, KlikOn-KlikOff and Domia Lite, do not require configuration and so do not appear here.
The configurable items is a list of hardware devices, with sub-items for each sensor value. In the screenshot of the main screen, all the devices have been expanded to show the values they report. Each of these sub-items represents a possible source of xPL messages, and are colour coded green or red to show whether or not the sending of xPL messages is enabled. If the item is new it is coloured blue. Items are considered new until they have been configured. An item can be configured by double-clicking on it or by highlighting it and clicking the configure button. The following screen will appear:
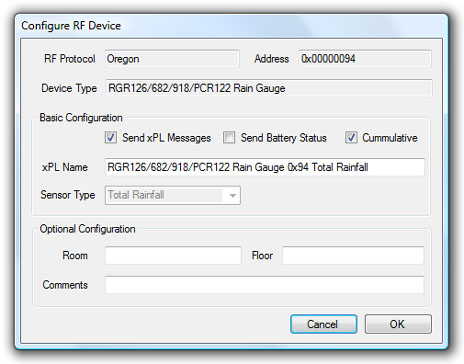
For some devices, such as RFXSensors, it is important to set the sensor type, so that the correct conversion can be applied to the raw data. Otherwise, the main use of this screen is to allow the sensor to be renamed. The name will be used to identify the sensor in xPL messages, and so must be unique.
The Optional Configuration section is provided so that the user may fill in the room, floor and comments that will be used in a future generic sensor schema.
Note - due to problems some users have experienced with interference from neighbouring sources, Visonic PowerCode sensors default to not sending xPL Messages and must be enabled in this configuration program.
The xPLRFX service sends and acts on messages using a number of xPL schemas. These are outlined in the table below:
Protocol |
Transmitter Schema | Receiver Schema | Comments |
| Standard X10 RF | x10.basic | x10.basic | |
| Security X10 | x10.security | x10.security | |
| X10 PC Remote | N/A | remote.basic | |
| ATI Remote Wonder II | N/A | remote.basic | |
| X10 Digimax 210/TH10 Thermostat | N/A | sensor.basic | Thermostat data is converted to three sensor.basic messages - two temperatures (current temperature and the thermostat setpoint) and an output representing the demand for heating or cooling |
| RFX Sensor | N/A | sensor.basic | Sensor data is sent in up to three sensor.basic messages - the current temperature, the sensor battery voltage and the measured sensor value. The type of the sensor (temperature, humidity, barometer) must be set in the configuration program. |
| RFX Power | N/A |
sensor.basic rfxmeter.setup |
The total power consumption is sent as a sensor.basic message of type "energy".
The count can be reset by sending a sensor.basic command with command=reset-records. During configuration of the RFX Power device, rfxmeter.setup messages are sent to indicate progress through the configuration process. The schema is outlined below. |
| Oregon Scientific | N/A |
sensor.basic datetime.basic |
Oregon weather sensors typically report more than one value. Each value is
sent in xPL using its own sensor.basic message. Messages from unwanted sensors
can be disabled in the configuration program. The datetime.basic schema is used to report the date and time provided by certain Oregon sensors that include an "Atomic Clock" feature. |
| Visonic | N/A | x10.security | Visonic CodeSecure and PowerCode commands are mapped to X10 security commands, and so appear as X10 security devices to xPL. |
| Electrisave | N/A | sensor.basic | The Electrisave device can have up to three current transformers attached. By default only the first is set to send xPL messages - the others can be enabled in the configuration program. |
| KlikOnKlikOff / ELRO / NEXA / Domia Lite | x10.basic | x10.basic | Commands for these devices are mapped to standard X10 house and unit codes, and so appear as X10 devices in xPL. |
| Byron HomeEasy (B&Q) |
x10.basic homeeasy.basic |
x10.basic homeeasy.basic |
Some devices are compatible with the Domia Lite protocol. Commands for these devices are mapped to standard X10 house and unit codes, and so appear as X10 devices in xPL. Other devices use a proprietary HomeEasy protocol, translated to homeeasy.basic in xPL. See here for compatibility information. |
| IKEA Koppla | x10.basic | x10.basic |
IKEA have now discontinued the Koppla range. Support has also been dropped
from the latest RFXCOM receivers, but it can be included as a special
request. The RFXMitter includes support for sending Koppla commands. Commands for Koppla devices are mapped to standard X10 house and unit codes, and so appear as X10 devices in xPL. |
| Harrison | x10.basic | N/A | Harrison curtain controllers are mapped to X10 house and unit codes. They appear as standard X10 devices to xPL. |
| Flamingo | x10.basic | N/A | Flamingo AB400 devices are mapped to X10 house and unit codes. They appear as standard X10 devices to xPL. |
Unlike previous RFXCOM transmitters, when sending X10.basic commands to the RFXMitter, by default the message will only be sent as standard X10. To select a different protocol, add a line the the end of the xPL message body as shown in this example to send a Domia Lite command:
xpl-cmnd
x10.basic
{
command=on
device=B6
protocol=domialite
}
Protocols values for use with X10.basic and the RFXMitter
KlikAanKlikUitKlikOnKlikOff
DomiaLite
ByeByeStandBy
HomeEasy
Elro
Nexa
Proove
Intertechno
Duwi
Koppla
Flamingo
Harrison
Waveman
In the case of KlikAanKlikUit, KlikOnKlikOff or Homeeasy devices, the use of X10 messages is restricted to devices that have address wheels. Newer devices are controlled via the Homeeasy.basic schema.
There is a new variant of the Homeeasy protocol appearing in Europe. By default, the RFXMitter will send using the UK protocol (which is also used by KlikAanKlikUit). To send Homeeasy messages to devices using the new EU protocol, add a line to the end of the homeeasy.basic command as shown below:
xpl-cmnd
homeeasy.basic
{
address=porch
unit=7
command=preset
level=12
eu=true
}
The rfxmeter.setup schema is used only when an RFX Meter (e.g. RFX Power) is being configured (Details of how to configure the device are included with it). The messages are sent to show the current state of the configuration process.
xpl-trig
rfxmeter.setup
{
address=0-255
message=
[counter=0-167772.15]
[version=0-255]
[type=Gas|Power|Water]
[interval=30|60|300|600|900|1800|2700|3600]
}
The possible messages are:
Interval
Calibration
Address
Reset-counter
Set-digit1
Set-digit2
Set-digit3
Set-digit4
Set-digit5
Set-digit6
Counter-set
Set-interval-begin
Set-calibration-begin
Set-address-begin
Identification
An rfxmeter.setup message always contains the address and message parameters. The counter value is included only for Calibration messages. Version, Type and Interval are included in Identification messages. The Interval value is also included in Interval messages.