


NOTICE
My involvement with xPL has come to an end. Automation has moved on considerably over the past few years, and it is now possible to buy a stand-alone controller off the shelf for a reasonable price, without having to spend hours writing your own code.
This website is being maintained as a record of my xPL development work up until 2011.
I have released the full source code of all my xPL projects into the public domain. You can download the archive from here.
Mal
Z-Wave is an increasingly popular short-range wireless protocol aimed at the home control market. The system is similar in cost X10, but is far more responsive and reliable, with the ability to report back the current status of devices, and to specify exact brightness levels for lamps. Being wireless, it shares X10's advantage in not requiring expensive retro-fitting in existing houses.
Z-Wave devices form a "mesh network", where each device relays messages on to its neighbours, thus allowing the network to cover an entire property while consuming a minimum amount of power. The mesh approach means that messages can be automatically rerouted if a device should fail.
A Z-Wave network does not require a PC to operate. Devices are organised into groups, so that switches and lamps can control one another directly. To automate the system, or add custom behaviours, a PC Z-Wave controller and software such as xPL will be required.
Unfortunately, ZenSys (the inventors of Z-Wave) are being very short sighted and do not provide support for open-source development. The manufacturers of the various PC Z-Wave controllers also do not provide details of their protocols. This means that providing free software to control Z-Wave devices is currently not possible. There is a reasonably priced alternative. ControlThink have created a Z-Wave SDK that is sold for under $70. This is designed primarily to work with the Intermatic USB Z-Wave Stick (which is included with the SDK for US customers), but it also supports other controllers such as the HomePro USB Z-Wave interface
The requirements for controlling Z-Wave via xPL are:
1) A PC running Windows 2000, XP or Vista.
2) A PC Z-Wave controller.
3) The ControlThink Z-Wave SDK.
4) .NET 2.0
5) An xPL installation consisting of at least xPLHub and xPLHal.
6) The xPLZWave service
Please note:
In the United States:
There is a wide range of Z-Wave devices available from many manufacturers. The PC interface recommended for use with xPL is the Intermatic USB Z-Wave Stick, which can be obtained free with the ControlThink SDK.
Everywhere else:
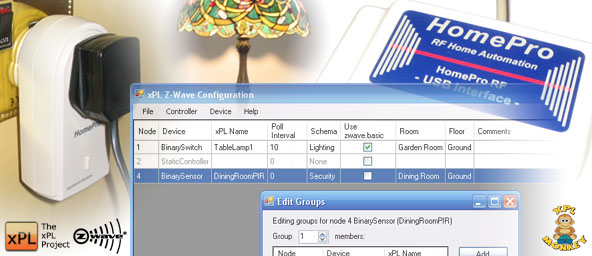
The range of Z-Wave devices is very limited at the moment, but more devices are due to become available in the near future. Users outside of the US will need to install the ControlThink SDK, but unfortunately there is currently no non-US version of the Intermatic USB Z-Wave stick (and no reduced-price software-only version of the SDK either), so a Z-Wave controller will need to be purchased at additional cost. The HomePro Z-Wave interface has been tested and works with the ControlThink SDK.


Platforms: Win98 / 2000 / XP / MCE / Vista / Win7
Version: 1.17.0
Filesize: 3.03Mb
Updated: 8th November 2008
 Download
xPLZWave does not work in isolation. To be useful it needs to be part of an xPL network. The basic software requirements for an xPL network are the xPLHub (which must be installed on every computer running xPL applications), and xPLHal, which is the "brains" of the system. Scripts running under xPLHal read incoming xPL events and send out commands to control other devices. A more detailed description of xPL can be found here.
Download and run the xPLZWave installer (.msi) file. The installation process is straightforward and will set up the xPLZWave service, and the xPLZWave configuration application.
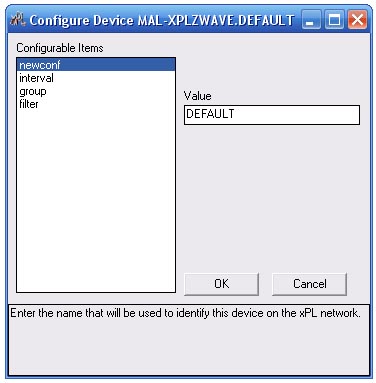
Once installed, run xPLHal Manager and find xPLZWave under the Devices/Awaiting Configuration tab. Double click on the xPLZWave entry and change the instance from Default to your chosen instance name (maximum 16 characters).
To test the system, start the xPLMonitor from xPLHal Manager's Tools menu, and turn one of your Z-Wave devices on or off. You should see a zwave.basic message appear. Note - if the device is an old one that requires polling, you may need to first run the xPLZWave configuration application to turn polling on for that device.
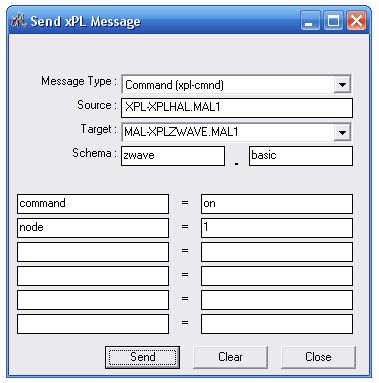
As an additional test, try sending an xPL message to command a Z-Wave device to turn on or off. In xPLHal Manager, select the Send xPL Message option from the Tools menu and fill in the details as shown below, replacing Node value with node index of your Z-Wave device.
If the messages are not received, or the xPLZWave service cannot be seen in xPLHal Manager, there may be an error in your xPL network. Download and run xPLDiag to test your installation. For further help, post a message to the xPL forums.
By default, each Z-Wave device will send zwave.basic messages in response to changes in state. The device id used in each message is simply the word "Node" plus the Z-Wave device node id, for example Node1, Node24 etc. To change the id, polling interval or xPL schema, run the xPLZWave Configuration program. A shortcut to this will have been placed on the Start Menu under Programs/xPL/xPLZWave.
The main window of the configuration program shows a list of all the Z-Wave devices known by the PC controller. Note - only one application can access the PC controller at a time. While the configuration program is running, the xPLZWave service will be stopped.
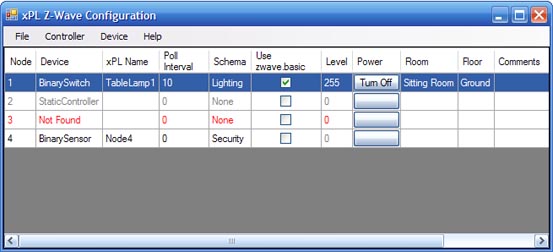
Grey text is used for devices that cannot be configured, such as a controller or a repeater node. These devices do not generate or respond to xPL messages.
Red text denotes a device that cannot be found in the network. It may have failed or have been removed. The configuration can be deleted by right-clicking the line and selecting "Remove".
The first column is the node ID of the Z-Wave device. These are assigned automatically when the device is added to the network and cannot be modified.
Next is the Z-Wave device type. This information is obtained from the Z-Wave network and cannot be edited.
The xPL Name is the device ID used in xPL messages. The default is "Node" plus the Z-Wave node ID (for example Node1, Node23 etc). This can be changed so that the device can be more clearly identified, but is limited to 16 characters.
The Poll Interval is used with older devices that do not report changes in state to the controller. By default the Poll Interval is set to zero, which means polling is disabled. If changes to the device are not being reported by xPL, try setting the Poll Interval to a number of seconds to see if that resolves the issue. The interval can be different for each device, but to reduce network congestion should be as long as practical. As a guide, there should be no more than one poll per second, so if there are 5 devices needing to be polled, the intervals should not be set below 5 seconds. Note - polling can be avoided on some devices by adding the PC controller as a member of one of the device's groups (usually group one). Refer to the device manual for more information.
The "Use zwave.basic" check box indicates whether the device will send xPL messages using the zwave.basic schema (checked), or an appropriate schema from one of the generic schema families (unchecked). The generic schemas support device discovery, enabling future xPL applications to build a list of controllable devices without having to know anything about Z-Wave or other protocols. The use of the generic schemas is therefore preferred, but is not essential for basic operation. Note - if a device is set to use zwave.basic, it cannot be commanded via the generic schemas, and it will not show up in any generic schema device discovery process.
The schema column shows which generic xPL schema family is used by the device. The schema depends on the Z-Wave device type, and cannot be changed. Lights and switches use the Lighting schemas, thermostats use the HVAC schemas and motion sensors use the Security schemas.
The level column reports the current level of the device. For lights, this equates to the brightness. For other devices, for example a motion detector, the level is usually either 0 or 255, representing on or off. Note that for polled devices, it may take up to the polling interval for changes to be reflected here. For lights, this value may also be edited, with the light being updated to the new value immediately.
The power buttons are included for testing purposes, and are used to turn Z-Wave devices on or off.
The final three columns contain optional information that is only used when responding to generic schema device discovery requests, although it may be an idea to fill it in to make device identification easier. "Room" provides the name of the room where the Z-Wave device is located (for example, Kitchen, Master Bedroom, etc). "Floor" provides the name of the floor of the building where the Z-Wave device is located (for example, First Floor, Basement, etc). The "Comments" column provides for any additional comments (up to 128 characters) regarding the device.
The xPLZWave configuration program also allows you to manage your Z-Wave network. The available commands can be found under the Controller and Device menus on the menu bar. Most of the commands are unavailable unless the PC interface is configured as the primary controller. Note - in most cases, it is preferable to have a Z-Wave remote control as the primary and leave the PC interface as a secondary controller. This is due to the need for the primary controller to be within 2m of any device being added to or removed from the network. Unless the PC interface is attached to a laptop, this is likely to prove impractical.
Add adds a new Z-Wave controller to the network. With newer controllers, Add Device can also be used to do this. The PC controller must be the primary and be within 2m of the controller being added. The new controller will be a secondary.
Remove removes a Z-Wave controller from the network. With newer controllers, Remove Device can also be used to do this. The PC controller must be the primary and be within 2m of the controller being removed.
Create New Primary Controller Used when the primary controller has failed to set up a new one with the current network configuration. This is to avoid having to add manually all the devices to a new controller. The PC controller must be a secondary Static Update Controller (SUC) to perform this action. Not all PC controllers can function as an SUC, so this function may not be available.
Transfer Primary Role makes another controller the primary. The PC controller will then become a secondary controller. The controller that is to become the new primary (usually a remote control) should be brought close to the PC controller and set to receive its network configuration.
Receive Configuration transfers the network cofiguration held by another controller to the PC controller. The other controller should brought to within 2m of the PC controller and set to send its configuration data.
Hard Reset Resets the PC controller to its default state as a primary controller. This is the only way to make a PC controller the primary controller in a network.
Note - transferring the primary role back and forth between controllers can result in phantom controllers appearing in the list of devices. This is a Z-Wave issue and not a bug in the configuration program. These entries can be deleted by right clicking on them and selecting "Remove".
Add adds a new device to the Z-Wave network. The PC controller must be the primary and be within 2m of the device being added.
Remove removes a Z-Wave device from the network. The PC controller must be the primary and be within 2m of the device being removed.
Configuration Parameters Many devices have a number of parameters that can be modified to change the behaviour of the device. The available parameter numbers should be listed in the device's user manual. To change a parameter, simply set the parameter number and enter a number into the value box.
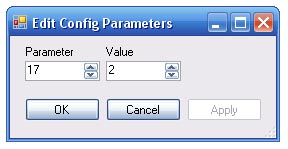
Click Apply to save the changes and continue editing, or OK when finished.
Groups the PC Controller can be used to view and edit a device's groups. After selecting this option a dialog opens allowing the user to view the contents of one group at a time.
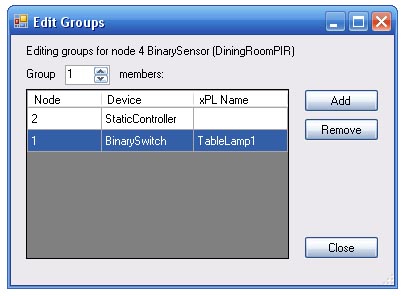
Note - if a "Device did not respond" error is produced, it may be that the device needs to be woken up in order to have its groups edited. For example, to edit a ZIR010 Motion Sensor's groups, the cover must be removed and the small button pressed to activate the device.
To add a device to a group, set the group index and then press add. A dialog will appear allowing you to choose the device to add to that group.
Rediscover Device if a device is moved to a new location, this command will get the Z-Wave mesh network to refresh its routing information for the device, so that messages still reach it by the shortest possible path. The PC controller must be the primary to carry out this command.
Replace Failed Device this is used when a device has failed, so that the replacement will retain the same node Id. As with Add Device, the PC controller must be the primary and within 2m of the new device when this operation is being performed.
When configuration is complete, simply exit the program. Any changes will be saved automatically and the xPLZWave service will be restarted.